Tuesday, 9 July 2013

Nail of the Day: Featuring Sally Hansen, Orly and Color Club

 This post is dedicated to all my nail polish lovers! I'm not one of those girls who consistently maintains their nails to look the absolute best that they can, but on the odd day, I do become inspired to experiment with my nails and see what I can come up with. This is what I've done below. 


I wanted to do something festive, in the spirit of my exams finally being over. I decided to use the brightest pink nail polish that i owned which was the Color Club Professional Nail Lacquer in Peppermint Twist.

Color Club Professional Nail Lacquer in Peppermint Twist

I then added the Sally Hansen No Chip Acrylic Top Coat over the pink nail polish, and this acted as the glue for my gold sequins, which I carefully placed in the center of the base of each of my nails. I added a second layer of the clear top coat over the sequins to secure them in place. The top coat also gave my nails its shiny finish as the Color Club nail polish dries fairly matte.

Sally Hansen No Chip Acrylic Top Coat

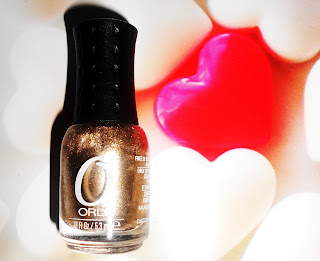
For my accent nail, I used the Orly Nail Polish in Luxe as my base, which is a beautiful, metallic gold color.

Orly Nail Polish in Luxe

For the festive touch, I added the Sally Hansen Hard as Nails Xtreme Wear Nail Color in Strobe Light over the gold color. This nail polish is a clear polish in which chunky iridescent and fine, blush pink glitter particles are suspended. I used the same technique with this nail polish as I did with the top coat to adhere the gold sequin to my nail.

Sally Hansen Hard as Nails Xtreme Wear Nail Color in Strobe Light

And it's that simple! 


I hope you are inspired to experiment some more with your nail polish after reading this post. I even feel the urge to paint my own nails after writing this post, as they're quite chipped at the moment! lol!
I hope you are having a great day! :) 

P.S. Don't forget to follow my blog with Bloglovin', as I will be trying my best to post a lot more frequently.

Monday, 28 January 2013

Jordana Metal Rocks and Glitter Rocks Retractable Eyeliner Pencils: A Review

Hi everyone! It's been more than a month since I last posted on my blog, but I have been extremely busy with my schoolwork, and life in general. Today, however, I have a really good discovery that I would like to share with you. 
As we are currently in the midst of the Carnival season in my home country of Trinidad and Tobago, I have been on the hunt for some festive products to use on my clients, namely, colored eyeliners. I had heard great things about the Jordana colored eyeliners from a Youtuber with the username CarliBel55. She constantly raves about the Jordana liners in her videos, so I decided to give them a try. On a whim, I purchased three different colors all at once, and I am thoroughly pleased that I did. 

Jordana Metal Rocks and Glitter Rocks Retractable Eyeliner Pencils

These eyeliners are richly pigmented. They are creamy, yet they set to a waterproof finish. They work great as a base for eye shadows, and they can also be used in the inner rims of the eye. They are packaged as a retractable pencil, which saves you the trouble of having to sharpen it. Did I mention that they are incredibly affordable? Because they are! I absolutely love them and do not regret buying them whatsoever! I recommend them to any and everyone!

Below are the three colors that I picked up:
Jordana Glitter Rocks Retractable Eyeliner Pencil in Glam Rock Green

Jordana Metal Rocks Retractable Eyeliner Pencil in Paradise Blue

Jordana Metal Rocks Retractable Eyeliner Pencil in Purple Prism

I hope that you try out these eyeliners if you're looking for some good-quality, colored eyeliners! Have a great day! :)

Wednesday, 26 December 2012

Sparkling Diamonds: A New Year's Eve Makeup Tutorial

Hi everyone! I hope you are all enjoying a very merry Christmas season with your friends and family! Quickly approaching is an exciting day to mark the end of the year, New Year's Eve. I know that some of you will be as excited for this day as I am, as there will be many parties to attend, for which you may don your most glamorous outfit to celebrate the ending of this year and the beginning of a new one. To complement your outfit, here is a sparkly eye makeup look that will go perfectly with almost any outfit, and is also very easy to recreate. I really do hope that you try out the look! :)


This is the eye shadow palette that I used to create this look:
BH Cosmetics Party Girl Eye Shadow Palette

These are the brushes that I used to create this look:


In this photo, my eyebrows have already been filled in (I used a dark brown eye shadow) and I have also applied a very small amount of eye shadow primer to my eyelids.

Here, I have mapped out the shape that I want my eye shadow to look like, using a gel eyeliner and a small angled brush by Ecotools. 
The gel eyeliner I used was the L'Oreal Lacquer Liner 24H in Blackest Black. This will  create an intense base for the eye shadow which will be placed on top it.


Next, I used the NYX Jumbo Eye Pencil in Milk as a base for my inner corner highlight. I smudged this into the black base already on my eyelids.
NYX Jumbo Eye Pencil in Milk

Next, I applied a champagne colored eye shadow to the inner corners of my eyes, to act as a shimmery highlight.

Next, I placed a shimmery gray eye shadow onto the center of my eye lids, using an eye shadow brush by Ecotools.

Finally, using a smudge brush by the brand e.l.f., I applied a sparkly black eye shadow to the outer corners of my eyes, following the shape that was previously created using the gel eyeliner. I also used this brush, as well as the clean e.l.f. contour brush, to buff out any harsh edges of my eye shadow, thereby creating a soft, smokey eye look.

I also mirrored what was done on the upper lid of my eye by doing the exact same thing along my lower lash line.

Next, I pressed some silver glitter onto the center of my upper lid. I used the eye shadow brush by Ecotools, which I had previously used, for this step.

Finally, I applied the gel eyeliner along the inner rim of my eye using the small angled brush by Ecotools, and I also applied lots of black mascara to my upper and lower eyelashes.

I used the L'Oreal Telescopic Mascara (Original).
And this is the completed, festive New Year's Eve eye makeup look!

This eye makeup will be best complemented by a peachy-pink shade of blush on the cheeks and a nude, glossy lip!

This nail polish was the inspiration for this eye makeup tutorial. It is the perfect glittery polish for New Year's Eve and will even match your eye shadow!
L.A. Colors Color Craze Nail Polish in Sparkling Diamonds 

Tuesday, 4 December 2012

L’Oreal Telescopic Mascara (Original): First Impression


Hi everyone! For any of my readers who know me personally, you would know that I have quite an obsession with youtube beauty videos! I watch every kind there is: haul videos, product reviews, makeup tutorials, first impression videos, and the list goes on. In quite a few videos, I’ve seen people using the L’Oreal Telescopic range of mascaras. I, therefore, had to give one a try. I decided to go with the original L’Oreal Telescopic mascara.


This product is marketed as a lengthening mascara, as seen on the packaging. It is contained in a very sleek, gold tube that resembles a telescope. The wand of this mascara is a very thin, plastic brush with extremely short bristles.


The photos below show the application process of the mascara. This was my first time using the mascara, and the following were my immediate thoughts on the product. The first photo shows my eyelashes without any mascara. The second photo shows my right eye (seen on your left) with mascara, and my left eye without. The third photo shows my right eye with two coats of mascara, and my left eye with only one. The last photo shows both eyes with two coats of mascara each.


After applying one coat of mascara, it can be seen that my eyelashes were immediately separated and lengthened. There was no clumping of the mascara, whatsoever. After about two minutes, I applied a second coat of the mascara to my eyelashes. Still, no clumping occurred. It can be seen, however, that the second coat of mascara made my eyelashes look a bit ‘spidery’, and not as natural as they did with just one coat of mascara. However, the eyelashes do remain separated, and are thicker toward the lash line. They were also lengthened even further with the second coat of mascara.
Also, I had not curled my eyelashes prior to applying this mascara, but they did remain curved upwards, as seen in the photos. The formula of this mascara is quite a wet one, and this did cause it to smudge a bit on my eye lids before it had had time to fully dry. This, however, can simply be fixed by using a cotton bud to remove any smudges. The thin brush of this mascara also allowed me to coat even the shortest lashes of the inner corner of my eyes with mascara, creating as much length as possible.


I hope that my thoughts on this mascara are informative, and that they assist anyone who was contemplating trying out this mascara to make a more educated decision! Also, I woud love it if you left me comments telling me what products you would like to see my first impressions/reviews on! Enjoy your day! J

Friday, 30 November 2012

How to make the most of your Eye Shadows: A Tutorial


Hi everyone! I hope you are all well! A friend of mine recently told me something that I found to be quite interesting. She mentioned that she owns the exact eye shadow palette (by the brand e.l.f.) that I had used in my first tutorial, “Bad to the Bronze”, but stated that when she uses the eye shadows, the color pay-off is not as intense as when I had used them. I thought that this would be an interesting topic to talk about, as throughout my experimentation with makeup, I have learned several tricks that, when combined, can give the most vibrant color pay-off possible.


These are all of the brushes that I used to create this makeup look.

Firstly, before applying any eye shadows to the eye area, I always like to use a primer or base of some sort. The one that I used to create this look is the e.l.f. Eyelid Primer. Using a primer helps to prevent the eye shadows from creasing, as well as gives the eye shadows something to adhere to. Only a pea-sized amount should be used for both eyes, as using more than that may have the opposite effect on the eye shadows, causing them to crease.

Next, I applied a white cream eye shadow to my eyelids. I used the NYX Jumbo Eye Pencil in Milk. Using a cream eye shadow underneath your powdered eye shadows is always a good idea, as this really serves to intensify the color pay-off that you can achieve. The white base that I chose to use helps the colorful eye shadows to show up true to color on the eyelids. Too much of the NYX Jumbo Eye Pencil should not be used however, as it does tend to crease due to its creamy texture. I recommend always using a primer before applying this product.

Next, I strategically placed the eye shadows on my eyelids.
This is the e.l.f. eye shadow palette that I used to create this look.

 I used a very light, bluish-green (almost white) shade on the inner third of my eye. 
The swatch to the extreme left shows the two shades combined.

Next, I combined shades of turquoise to create my lid color. 
The swatch to the extreme left shows the two shades combined.

As I began blending these eye shadows together, it can be seen that the color did fade a bit. The eye shadows in the e.l.f. eye shadow palette that I used do tend to be a bit chalky, so it is always important, as with any eye shadows you use, to layer the color on the eye lids. Using your finger to do this is the best method that I have tried. It gives a more concentrated application of color and reduces the amount of ‘fall-out’ from there may be.
Next, I mixed navy blue and black eye shadows and applied this to the outer corner of the eye, in an attempt to add some depth to the eye look. Again, it is important to layer the color in order to build up the intensity of the eye shadow. Especially with darker colors, it is easier to start with a little color, eventually building up the intensity to the desired amount.

Next, I added a black kohl eye liner to the lower water line of the eye. I used the Wet n Wild Color Icon Brow & Eye Liner in Black Black. I then smudged that out using a purple eye shadow. Smudging the purple eye shadow into the black eye liner also helps to intensify the color of the eye shadow, as the purple eye shadow by itself is not very pigmented.

I then created a winged line on my upper lash line using the e.l.f. Studio Cream Eyeliner in Black. 
The swatches in the photo on the right show how thin a line can be made using the Cala Eyeliner brush.

This is the Cala Eyeliner brush which is an excellent brush for creating a precise line of eye liner!
I then layered the NYX Liquid Eye Liner over it. I did this in order to make the eye liner appear darker, as it can be seen that the liquid eye liner used by itself is not very pigmented, but layering it over the cream eye liner simply intensifies the color, and also creates a smooth, even line.

Next, I applied a coat of my Maybelline 'the Falsies Flared' mascara in Very Black to my top and bottom eye lashes.

To complete the look, I used a cream colored eye shadow to highlight my brow bone and also filled in my eye brows using a light brown eye shadow. 
Revlon matte eye shadow in Vintage Lace.
Jordana Brow & Eyeshadow Powder in Natural Taupe.

And that is the finished look!


I really do hope that this blog post is helpful, and that you are able to adapt my tips to suit your own makeup routines in order to make the most of your eye shadows!